Tuesday 29 May 2012

Kitten Tuesday - Rimmel Peppermint

Pin It Now!
Sorry everyone for being late with my Kitten Monday post! Here she is, her mitted Toastyness.

 She is not amused at me being late! 

Why are cats so good at giving looks of disdain??
Sorry Toast! I will not be late again!

The polish I have for you today is Rimmel Pro in Peppermint. With the "pro" colours you get 12ml vs the 8ml in standard Rimmel polishes. The brush is also different, more paddle shaped which I quite like. It makes it easy to cover almost your whole nail in one stroke. Other people may think that it's too big, but I like a big, flat, paddlely brush.

As the name suggests Peppermint is a light turquoise colour and is a glossy creme finish. Goes equally great with fair, tan or darker skin tones. For the pics below I used 2 coats and one coat of Seche Vite as topcoat.


I decided to try and stay in the kitten/cat theme of things and I went with a leopard print stamp.
I always worry that stamping in black over such a light colour would look too harsh, so I went with my trusty Sally Hansen Natural White polish. I used Bundle Monster Plate BM221 for the leopard print stamp.


Rimmel Pro in Peppermint retails for £4.59 (well worth it imho) and is available from Superdrug and Boots here.  I hope you guys liked my subtle leopard print mani, and I promise that the next weeks Kitten Mondays will be on Mondays!


Pin It Now!

Wednesday 23 May 2012

Sleek Eau La La Liner Nail Art

Pin It Now!
Sleek just came out, a couple weeks ago, with a collection of different waterproof and smudgeproof liners in 20 different colours. I love coloured eye-liner so I promptly trotted down to my local Superdrug to pick a few.

You might be wondering what I'm doing posting a beauty post when this is a nail polish blog. Sleek say in their product description that the Eau la la liners can be used on eyes, lips, brows and body - so decided to use them on my nails. :P


When I swatched them in the store they reminded me of crayons so decided to do a crayon inspired mani with my liners.


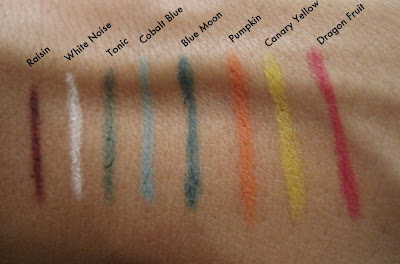
I used 2 coats of my Sally Hansen Natural White as a base colour. For the liners I added a little scribble pattern to each nail, and then sealed it in with 1 coat of Seche Vite. The colours are as follows: thumb is Raisin, index is Blue Moon , middle is Dragon Fruit, ring is Canary Yellow and pinky is Pumpkin. I think the white background really helps to show just how vivid these liners are.


So because these liners are really meant to be used on skin, I thought I should include some proper swatching on my hand. 

Indoor lighting

Natural lighting

Hope you enjoyed that, I like messing around with different products, every once in a while, to see if I can come up with new ways of using them. I think these are a great product if you like bright colours. They really have superior staying power and are waterproof. (My little tip for removing them is just use a cotton bud dipped in olive oil or another cooking oil).

Sleek Eau La La liners are £4.00 and are available from the Sleek website here.

Pin It Now!

Tuesday 22 May 2012

Barry M Black Multiglitter - Swatch & Review

Pin It Now!
I said yesterday that I would post a proper review and swatches on Barry M Black Multiglitter so here it is. :)


This polish is essentially holographic micro glitter in a black jelly/creme base. In the bottle this stuff looked awesome, sparkling all different colours so I snatched it up immediately. Here's an out-of-focus pic to show you the holo glitter.


I was so excited to put it on, but got so let down when I did. Meh. :(


As you can see from the pics this polish dries down to a gritty finish and the glitter loses all it's holographic properties. Instead of a sparkly holo-fest what you are left with is grey (yes grey) glitter with the odd holo particle here and there.


I even tried that trick where you run a cotton bud soaked in nail polish remover over the surface of the dried polish to let the glitter shine through more. That kills any holo effect the glitter has and leaves you with plain silver glitter. Sigh,  I tried my best to make it work Barry M...

So girls if you want my honest opinion it's a big thumbs down for Barry M Black Multiglitter. Don't waste your money, and instead get another one of the Barry M glitter polishes like the red, blue or green - they are brilliant!

Pin It Now!

Monday 21 May 2012

Toasty Mondays - Hello Kitty nail stickers

Pin It Now!
You're probably wondering what the odd title is about. Well, I have something extra special to share with you today!

 This is Toast!

Toast is my new Ragdoll kitten! I have had her for just 2 weeks and she's the cutest and cheekiest ball of fluff. I've been wanting a cat for a long time and am so happy to have her. We decided to call her Toast because she loves eating buttered toast! Isn't that weird for a cat? I don't often have toast for breakfast, but when I do she's right there in my face, climbing all over me and trying to get her paws on my plate. So I let her some (a crouton sized piece) and then try to eat my breakfast as fast as I can.

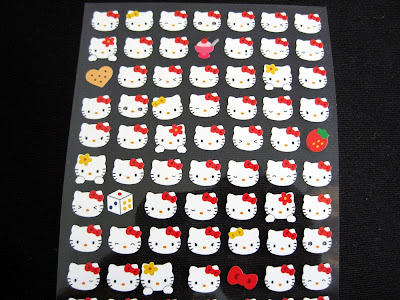
So in honor of her Toasted-ness I have a kitty inspired mani for you today. I found these Hello Kitty stickers in a shop called Artbox in Covent garden. They have all kinds of other funny stickers from Japan and Korea plus lots of other cute things, so I picked up a few different ones. They have an online store too, click here.

In the Hello Kitty sticker pack you get 109 stickers and I think it only cost me about £1.50. Here are some closer pictures so you can see all the different Hello Kitty expressions.


On to the mani. I started with 1 coat of Barry M Black Multi Glitter over my L'Oreal base coat. This isn't the best polish and I do a review of it here in my next post.


I added stickers to my thumb and middle finger (these are my widest nails) and tips in white (Sally Hansen) and red glitter (Barry M). I wanted to stick with the red, white and black colours of Hello Kitty.


(aww, smiley thumb kitty)

Cause I was so disappointed in lack of glitter in Barry M Black Multi Glitter I added some Rimmel Rock Your Colour Glitter topcoat in Disco Gold. That's more like it.


Not sure if I like the mani with or without glitter better? Hope you liked it and my intro to Toast the kitten! From now on Mondays will feature Toasty to lift us all out of our Monday blues (well I hope she does) ;)
Pin It Now!

Saturday 19 May 2012

Barry M - Gold foil Swatch & Stamp

Pin It Now!
Hi everyone, here's the followup to the Barry M Silver Foil post I did a few days ago. It's Barry M Instant Nail Effects in Gold Foil.


I actually think Gold Foil is less streaky than Silver Foil, but it's still streaky for a metallic polish.


However streaky-ness aside I think it's a winner for stamping! In the pic below I have it over Rimmel Sky High. I used Bundle Monster plate BM201 and Konad plate m63.


I'm really pleased I invested in the Gold and Silver foil effects polishes and am now wondering if I should get the Barry M Lilac Foil polish. What do you think, is Lilac Foil worth having? Or should I go with one of the Accessorize metallic one coat polishes? They look tempting...

Pin It Now!

Rimmel - Sky High, Swatch N Stamp

Pin It Now!
Today I present a polish I've had for several years. It's a summer favorite of mine for pedicures but I decided to give it a go on my fingers and was so pleased I did!


Rimmel Sky High is notorious to photograph accurately (just try a google image search for it). It always comes out more blue in photographs than it is IRL.

I was getting so frustrated trying to adjust the colour balance and had to give up in the end, cause nothing was working! Bleh. But luckily I discovered this great site for colour swatches!

It's called color-swatches.com and you can search for colour accurate swatches of almost any colour by any brand. I'm definitely going to use this whenever there's a colour that's hard to photograph. 

Here is the accurate colour swatch of Rimmel Sky High
For the link to the Rimmel Sky High swatch on color-swatches.com plus accompanying info click the image above or here.

Ok ok so this is a little cheeky of me.... I know I used the same stamps in my Barry M Gold Foil post but I just really like the combination of deep turquoise and gold. It's a combi that's been in use since ancient Egypt and I think they (still) work great together.

(I'm going to have to come up with a mani with all these colours, love how they're put together!)


Do you like turquoise and gold together? I'd love to see your pics so leave me a comment with links to your manis! :)


Pin It Now!

Wednesday 16 May 2012

Barry M - Silver Foil

Pin It Now!
Apologies everyone for not posting regularly, but today I wanted to quickly share this with you. I got this Barry M Silver Foil polish for stamping and I can say I've definitely not been disappointed! I also got the Gold Foil polish too, but that's for another post. ;)


Formula wise this polish is a little streaky, but with careful application this can be reduced a lot (hrmm ignore my index and ring finger ;), got dinked as I was picking up my camera). I recently found this great method for dealing with streaky polishes, and can't wait to try it out. After you apply 2 coats of polish and they're fully dry you sponge over the streaks with a cosmetic sponge. Hides the streaks completely! I can't for the life of me remember where I read this but will give credit where credit is due as soon as I find the blog post. (If you guys know who I'm talking about, please let me know and I'll link to her blog!).

I decided to use my Rimmel Blackout and Bundle Monster plate BM208 for the stamping. I really like the cracked mirror effect of this stamp. Also the more I use Rimmel Black Out the more impressed with it I am. You really don't need a special Konad stamping black polish if you have Black Out.


I hope you liked this mani, I just think that the BM208 shatter pattern is so versatile. I know I'm going to be using it a lot. Which stamping plate is your favorite (it's hard to choose just one isn't. How about top 5 then?)?
Pin It Now!

Wednesday 9 May 2012

Sally Hansen french manicure kit in Sheerly Opal

Pin It Now!
Hi everyone! A quick mini post today. I wanted to show you guys one of the first polish sets I bought - a Sally Hansen french manicure kit in Sheerly Opal.

This kit comes with two polishes, Natural White for the tips and Sheerly Opal (an iridescent light pink). I wanted to try out using a classic french manicure kit with tip guides and this kit came with both straight guides and curved ones. It also came with instructions for french manicure newbies like me. ;)

Here's how it turned out.


(Pay no attention to the index finger nail - said in Wizard of Oz voice) I placed the tip guide stupidly!

Also I wasn't quite fast enough at removing the nail guides before the white polish dried so my edges are a bit jagged.

What I like was that the Sheerly Opal colour has this lovely shine and light blue to pink duochrome effect. It's a work appropriate polish with a subtle hint of personality. I'd wear this polish just on it's own too.


What I didn't like is that the white polish was so "chalky" and streaky to apply. Still, waste not want not - I've used the white loads for stamping. All in all not a bad for my first Sally Hansen kit.

Do any of you use french manicure kits or guides? Any you would recommend?
Pin It Now!

Monday 7 May 2012

Models Own - Edamame

Pin It Now!
A couple weeks ago I went to the Models Own pop-up store at Westfield!


It was magical! So many colours and the staff were real sweethearts and super helpful finding me all the polishes I was looking for.


Today I'm showing you just one of the many polishes I bought that day!

I'm pretty sure Models Own did not mean to call this polish Endamame...or maybe they did? It says Endamame on the bottle but Edamame on the website. I'm sticking with Edamame, it fits the colour of edamame beans spot on.

Edamame is a bright light green with a lighter green shimmer through it. Really pretty and a perfect green for this spring.


I really don't understand all the bad press on this polish. I think it's because it doesn't suit fair skin with pink undertones. If you have tan, olive or darker skin tones with yellow undertones this is going to look great on you!


It wears really well. Wore it for 2 days without any chipping and only a tiny bit of nail edge wear. I decided to stamp it with Bundle Monster plate BM204 in white to jazz it up for my birthday. ;)


Sorry for the fuzziness of these pics, it's been massively rainy and overcast for 4 straight weeks here!
I think I'm going to have to build my own light box to get decent pics!


Anyway, I love Models Own Edamame! It's now my favorite green polish! Which green polishes are your favorites? I'm always looking for new greens to collect. ;)
Pin It Now!